Game development is not easy. Games can take weeks or even years to make, depending on the size. During development, often you’ll make changes that will set you back in progress, or maybe even break your game. It’s important to use source control (also called ‘version control’) with your games. When used properly, this will make it easier to add new features, and handle major bugs. The most common source control, and the focus of this tutorial, is Git. From their site:
“Git is a free and open source distributed version control system designed to handle everything from small to very large projects with speed and efficiency. Git is easy to learn and has a tiny footprint with lightning fast performance. It outclasses SCM tools like Subversion, CVS, Perforce, and ClearCase with features like cheap local branching, convenient staging areas, and multiple workflows.” ~ https://git-scm.com/
There are many different features of the git version control system. Many of which, will not be covered in this tutorial. This tutorial is meant to teach the basics.
You can find the proper downloads for your operating system here: Git – Downloads. See here for git installation: Getting Started – Installing Git.
This tutorial will be focused on command-line operations. If you want a more visual solution, there are several visual git clients. Often, they can be more intuitive than using the command prompt or terminal. Here are a few:
In addition, a lot modern IDEs have built-in support for version control.
Initializing your local Git repository
All of my examples and code, utilize Git, and are stored on GitHub. You don’t have to make your source code public, but having it online can serve as a good backup. Whenever i start a project, the first thing i do is setup source control for that project using git. Once git has been installed, you can setup your local git repository with a single command:
git initYour project folder doesn’t have to be empty to run this command. It’s okay if you’ve already made progress, and are just now adding git.
Adding & Committing your changes
First, let’s talk about ‘commits’. A commit is simply a snapshot of your project at a given point in time. When you ‘commit’ your changes, you add them to your local git history. Once a commit has been created, In the future you’ll be able to see each file changed, when it was changed, what specifically was changed, and who changed it. You’ll also be able to more easily undo (aka revert) changes.
Once your local repository has been setup (using the ‘git init’ command), make sure to do a new commit after every successful set of changes.
Adding files to the staging area
Before you can create a new commit, you need to add your changed files to the ‘staging area’. What is the staging area? The ‘staging area’ exists internally in git, but it consists of the set of files that you want to commit next. You can add all files in your project to the staging area, or just a few. Sometimes, you will only want to commit specific files (maybe some of the others are broken).
// You can add single files
git add ./path/to/my-changed-file1.ext

// You can manually specify multiple files
git add ./path/to/my-changed-file1.ext ./path/to/my-changed-file2.ext

// You can add all files of a given type
git add *.c

// you can add all files in single folder
git add res/*

// you can even tell git to add EVERY changed file
git add --all
You can view all files in the staging area using the ‘git status‘ command, and you can remove files from the staging area, using the ‘git restore‘ command:
// You can unstage single files
git restore --staged ./path/to/my-changed-file1.ext

// You can manually specify multiple files
git restore --staged ./path/to/my-changed-file1.ext ./path/to/my-changed-file2.ext

// You can unstage all files of a given type
git restore --staged *.c

// you can unstage all files in single folder
git restore --staged res/*

// you can even tell git to unstage EVERYTHING from the staging area
git restore --staged .
Creating your commit
When you’ve added all the necessary files into the staging area, you can now create a commit. when you create your commit, all files in the staging area will be add to the local git history.
git commit -m "a message explaining what you did"After this command, Your changes have officially been added to the local git history. If you want to see those changes, you can use the ‘log’ command:
git logThis will show you your recent commits:
commit 36ec44cab3a1d3590f04c8a70c296e94ce218a2c (HEAD -> master, origin/master)
Author: LaroldsJubilantJunkyard <[email protected]m>
Date:   Tue Oct 15 20:19:23 2024 -0400

    making sure links are white and underlined in the imporant notes

commit d5ebb65373a9bc67b6e2ea1f1bfaee1f5cf438e7
Author: LaroldsJubilantJunkyard <[email protected]m>
Date:   Tue Oct 15 19:18:59 2024 -0400

    initial commit
Pushing your commits to a remote repository
At this point, you can continue. However, all of your data is stored locally on your computer. Specifically, in the ‘.git’ folder at the root of your project. The next step is to push your changes to a remote repository. Their are multiple solutions, but the most common is GitHub.
Working with GitHub
If you don’t have a GitHub account: Go to the GitHub website, and sign-up for a free account.

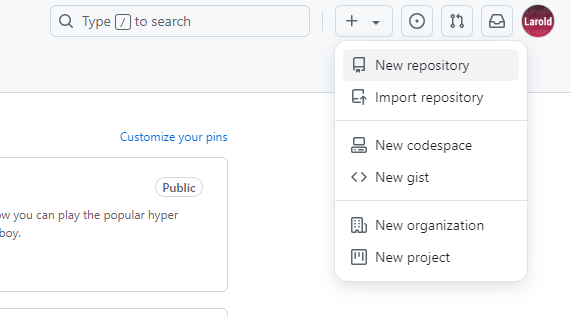
Once you’ve created an account and logged in, you can create a new repository by clicking the plus sign in the top right of the screen.
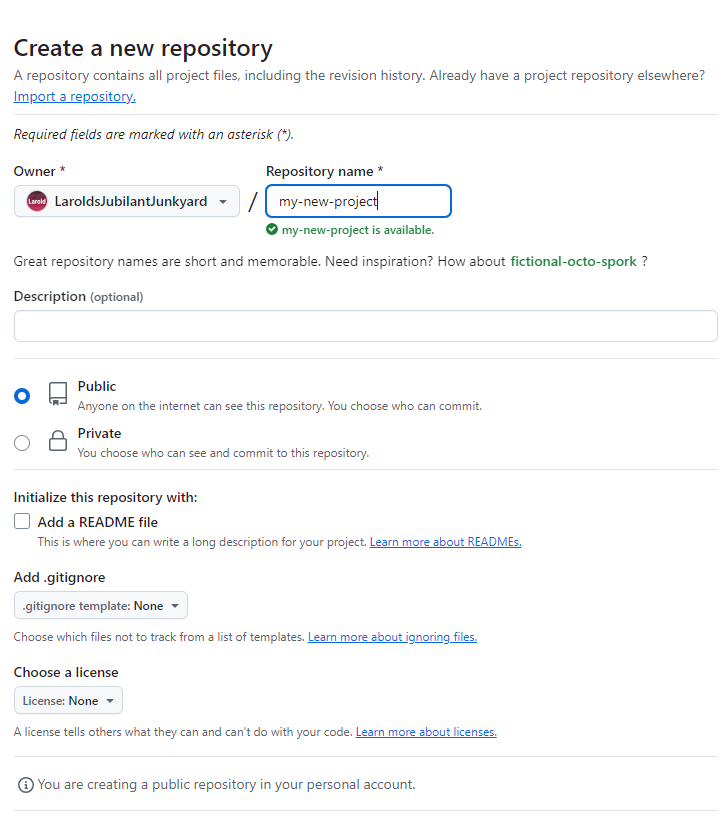
Give your repository a good name & description. These can be changed later if need be. You can make the repository public or private. If you make it public, everyone will be able to see your code.
Once you create your repository, GitHub will present you with some instructions on getting going:
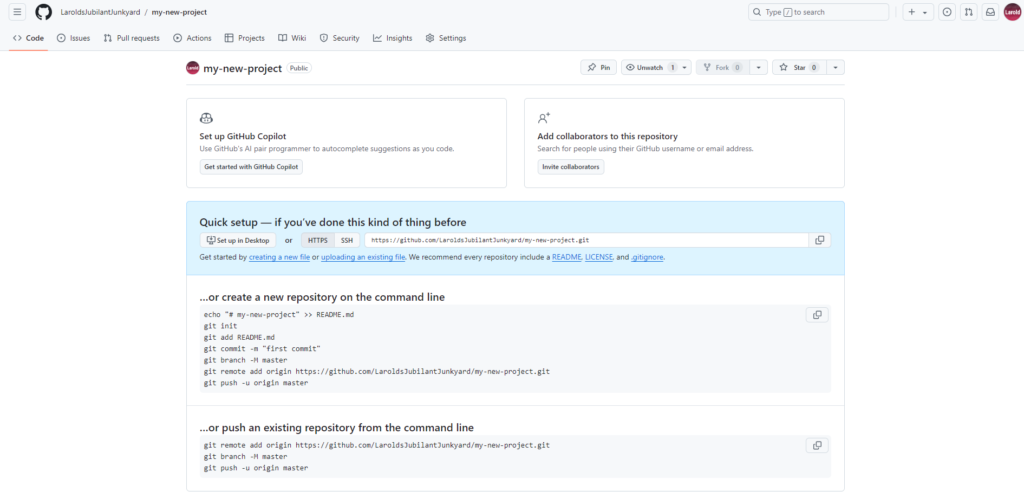
If you haven’t already created a local git repository for your project, inside the project, you should perform these commands: (We already created a git repo earlier in this tutorial using the ‘git init’ command).
git init
git commit -m "first commit"
git branch -M master
git remote add origin https://github.com/LaroldsJubilantJunkyard/my-new-project.git
git push -u origin master
If you have already created a local git repository, commit your changes, then run these commands:
git remote add origin https://github.com/LaroldsJubilantJunkyard/my-new-project.git
git branch -M master
git push -u origin master
This will ultimately push all of your changes to github. Let’s look at the ‘remote‘, ‘branch‘ and ‘push‘ commands:
The basics of branches in git
In git, you can have multiple branches. Each branch is a separate version of your code. You can create as many as you want, and they can be as different as you want.
There are many different branching strategies with git. To keep things simple, we won’t go in depth with branching. Know this, All repositories have a main branch. Sometimes this branch is called ‘main’, and sometimes it’s called ‘master’. Those are the 2 most common names (although it could be named whatever you want). If you think of your project’s codebase is like a tree. This main/master branch is the trunk of the tree.
From the above code snippet, The ‘git branch -M master‘ command simply renames your current local branch to be ‘master’. This isn’t 100% necessary. You could use ‘main’, you could use ‘whatever-you-want’. (just be sure to use that value in later commands instead of ‘master’)
Learn more about branch management here.
Locally specifying your remote repository
The following line, tells your computer where to upload your changes to:
git remote add origin https://github.com/LaroldsJubilantJunkyard/my-new-project.gitThe ‘git remote add‘ command means that we are adding a remote repository. A place, online, to save our files.
The word ‘origin’ is the local nickname for this remote repository. You can connect your project to multiple remote repositories (if you wanted, but we wont here). When we later tell git to push everything to ‘origin’, it will know to push your project to your github repo (in the case of this tutorial: ‘https://github.com/LaroldsJubilantJunkyard/my-new-project.git‘ )
Learn more about remote repositories here.
Pushing your code
The final command to talk about is the ‘git push‘ command. “The ‘git push‘ command is used to upload local repository content to a remote repository. Pushing is how you transfer commits from your local repository to a remote repo.” ~ Atlassian
Here’s the general syntax for the command:
git push <remote> <branch>- For ‘remote’ we use the “nickname” from before: “origin”
- For the ‘branch’, recall we renamed our local branch to ‘master’. we’ll use that value as the branch.
git push -u origin masterYou should have noticed one more argument: “-u”. This is shorthand for ‘–set-upstream’. This argument locally “sets our upstream branch”. With git, your upstream branch, is where to push future commits. Once your upstream branch has been set, you can push simply using:
git pushA barebones ‘git push’ will always push to your upstream branch. Learn more about upstream branches here.
Undoing changes in Git
Occasionally, you’ll make a series of changes that you want to undo. With version control, all of our changes are available to us.
You can use the ‘git restore’ command to unstage changed files.
// Remove the file from the staging area
git restore --staged ./path/to/my-changed-file1.ext
This will remove them from the staging area, but not undo their changes locally yet. You can undo all local uncommitted changes by removing the ‘–staged’ argument.
NOTE: This is permanent. If you want to temporarily remove all uncommitted changes, look into stashes.
// Discard all uncomitted changes
git restore ./path/to/my-changed-file1.ext
If you want to restore a specific version of a file, first find your commit id using ‘git log’ or the GitHub website:
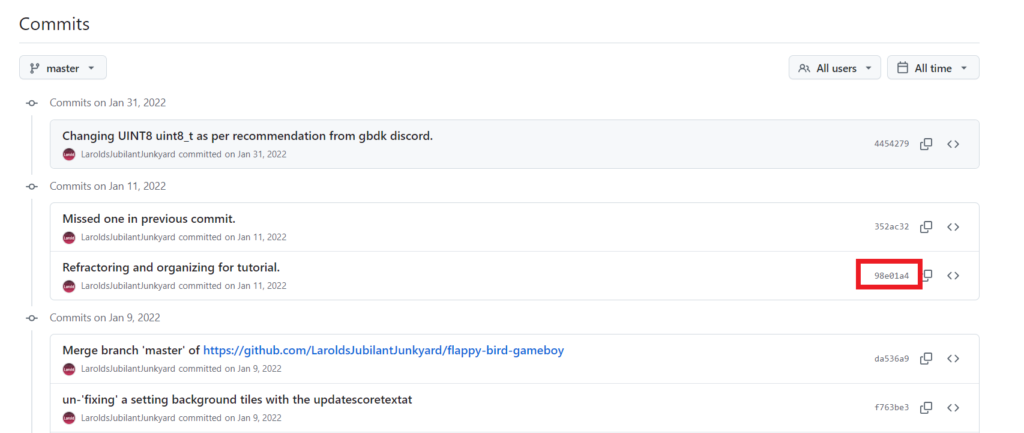
Now, you can pass that commit id into the ‘git restore’ command, along with the ‘–source’ argument.
// Revert all uncomitted changes (to 98e01a4) for a single file
git restore --source 98e01a4 ./path/to/my-changed-file1.ext

// Revert all uncomitted changes (to 98e01a4) for your entire project
git restore --source 98e01a4 .
Wrapping things up
That covers the basics, without going too deep down the rabbit hole.
For beginners, as your work on your game, regularly add & commit your changes locally. Make sure to use descriptive messages, so future you (or any potential collaborators) understands why you did certain things. Backup your project online by pushing to your remote repository.