Whether it be dialogue, the heads-up interface, or in your menus; drawing text is an essential part of game development. It guides your player and provides meaning and context for your game. Drawing text in GBDK-2020 is relatively easy, it’s just drawing tiles on the background or window.
You can find the code for this tutorial in this github repo: Drawing Basic Text. This tutorial is the first of three tutorials about drawing text with GBDK. The second tutorial will add more advanced features. The third tutorial will switch a third-party library.
If you don’t know how to draw tiles on the background, start with my other tutorial about drawing backgrounds. Once you understand the fundamentals, we’ll start by introducing our font:

This is a basic font I created in aseprite. It includes a lot of common characters used in games. We’ll use png2asset, to convert this png file into a .c and .h file. Once these files are included into our project (not shown), we’ll put the tile data into VRAM:
#include Our Character Map
We need to map our letters/numbers/symbols to tiles in VRAM. If our font tiles are placed in front of all other background tiles, here’s how the character mapping will look.
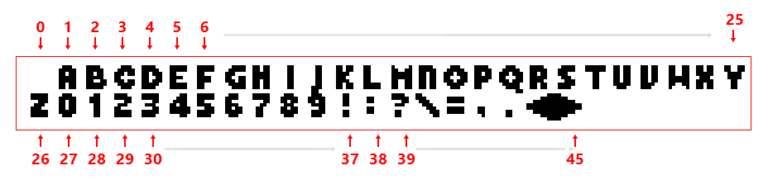
IMPORTANT NOTE: If you want to draw any backgrounds, their tiles will have to begin at index 46, to avoid any interference.
Code-wise, our character mapping looks like this:
uint8_t GetCharacterVRamTile(char character) {

    uint8_t vramTile=0;


    // Char's can be interpreted as integers
    // We don't need to map every alpha-numeric character
    // We can use basic math to simplify A-Z and 0-9
    if(character >='a' && character <= 'z')vramTile = (character-'a')+1;
    else if(character >= 'A'&&character <= 'Z')vramTile = (character-'A')+1;
    else if(character >= '0'&&character <= '9')vramTile = (character-'0')+27;
    else {
        switch(character) {
            case '!': vramTile = 37; break;
            case ':': vramTile = 38; break;
            case '?': vramTile = 39; break;
            case '/': vramTile = 40; break;
            case '=': vramTile = 41; break;
            case ',': vramTile = 42; break;
            case '.': vramTile = 43; break;
            case '<': vramTile = 44; break;
            case '>': vramTile = 45; break;
        }
    }

    return vramTile;

}
GBDK Background/Window address functions
With our font and character map explained, I’ll introduce you to two functions:
- uint8_t* get_bkg_xy_addr ( uint8_t x, uint8_t y ) – Get the address of X,Y tile of background map
- void set_vram_byte ( uint8_t * addr, uint8_t v ) – Set byte in VRAM at given memory location
NOTE: if you want to draw on the window, use ‘get_win_xy_addr‘ instead of ‘get_bkg_xy_addr‘.
For writing a single character, we need the VRAM address for the background tile we want to draw on. To get that, we’ll use the ‘get_bkg_xy_addr‘ function. We’ll pass it the column, and row of the desired tile. It will return us a pointer to an unsigned integer.
We’ll pass that pointer, and the index for our character tile; to the second function: ‘set_vram_byte‘. That will complete the change.
NOTE: If your background/window has been moved, your text might not draw (visually) at the location you expected.
Drawing a single Character
For writing a single character, we’ll combine our character mapping and the ‘set_vram_byte‘ function:
// Get the address of the first tile in the row
uint8_t* vramAddress = get_bkg_xy_addr(column,row);

// .. then later

// we increase the vram address to move horizontally to the next tile
set_vram_byte(vramAddress++,vramTile);
We pass the above function an address, and which letter we want to draw.
Drawing Strings of Text
To draw a string of text we’ll iterate through that string, until we reach the ‘\0’ character. This character is automatically added to the end of strings when compiled.
During this process, we’ll jump to a new row every 20 characters (same as the width of the game boy, in tiles). For each row, the code will get the address of the first tile in that row, and simply increment it after drawing the letter. This is much more efficient than calling ‘get_bkg_xy_addr‘ every iteration.
void DrawText(uint8_t column, uint8_t row, char* text){

    // Get the address of the first tile in the row
    uint8_t* vramAddress = get_bkg_xy_addr(column,row);

    uint16_t index=0;

    while(text[index]!='\0'){

        char character = text[index];

        // Draw our character at the address
        // THEN, increment the address
        uint8_t vramTile = GetCharacterVRamTile(character);

        set_vram_byte(vramAddress++,vramTile);

        index++;

    }
}
Drawing text with a typewriter effect
If we want to add a typewriter effect, we can play a noise and call ‘vsync’ between iterations.
void DrawText(uint8_t column, uint8_t row, char* text){

    // Get the address of the first tile in the row
    uint8_t* vramAddress = get_bkg_xy_addr(column,row);

    uint16_t index=0;

    while(text[index]!='\0'){

        char character = text[index];

        // Draw our character at the address
        // THEN, increment the address
        uint8_t vramTile = GetCharacterVRamTile(character);

        set_vram_byte(vramAddress++,vramTile);

        index++;

        // Play a basic sound effect
        NR10_REG = 0x34;
        NR11_REG = 0x81;
        NR12_REG = 0x41;
        NR13_REG = 0x7F;
        NR14_REG = 0x86;

        // Wait two frames
        // This creats a typewriter effect
        // Increas the amount of 'vsync's to increase the delay per character
        vsync();
        vsync();
    }
}
Conclusion
That’s it for drawing text. You can now use this to add menus, dialogue, and more to your games. I hope you found this tutorial helpful. Check out my related github repository: Drawing Basic Text. If you want to take your text drawing to the next level, check out my tutorial on Drawing Advanced Dialogue in GBDK.