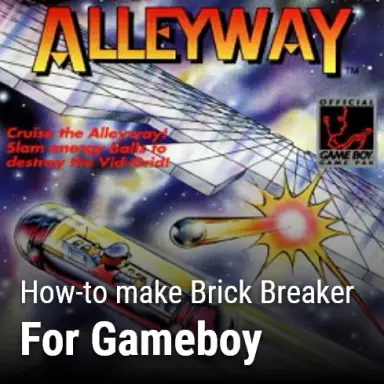
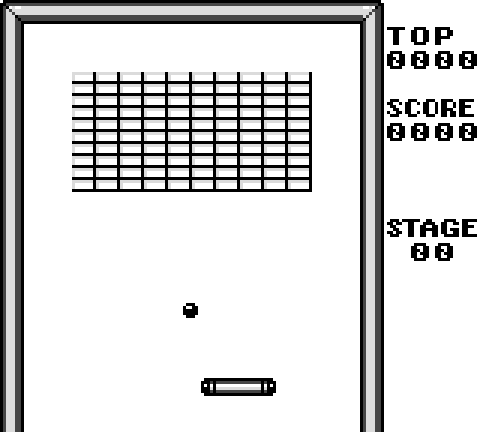
Brick Breaker is a classic arcade game, and excellent beginner project. This break breaker tutorial is part of my Re-Creating popular Games for the Gameboy tutorial series. In this tutorial, you’ll use the 2020 Gameboy Development Kit (GBDK 2020) and the C Programming language to recreate the classic Bricker Breaker Game: Alleyway.
If you are not familiar with GBDK 2020 yet, i have a tutorial series on that: How to make Games for Gameboy. It should help you get started.
The code for this Brick Breaker Tutorial will be available for free on GitHub. This tutorial is not 1-for-1 follow along style. Meaning some code snippets might not be included. The best way to utilize this tutorial is by downloading the free source from GitHub.
The graphics for this game are from The Spriters Resource. This tutorial is for educational purposes, they cannot be re-sold for commercial reasons.
Setting things up
Before we can start drawing the ball, the background, or the paddle we must get the Gameboy’s Video RAM (VRAM for short) in the proper state. In VRAM we’ll store the tiles used for each object, and our color palettes.
void main(void){

    DISPLAY_ON;
    SHOW_SPRITES;
    SHOW_BKG;
    SPRITES_8x8;

    // Turn on sound
    NR52_REG = 0x80;
    NR51_REG = 0xFF;
    NR50_REG = 0x77;

    set_sprite_palette(0,1,BlackAndWhitePalette);
    set_bkg_palette(0,1,BlackAndWhitePalette);

    set_bkg_data(0,Bricks_TILE_COUNT,Bricks_tiles);
    set_bkg_data(USERINTERFACE_TILES_START,UserInterface_TILE_COUNT,UserInterface_tiles);
    set_bkg_data(FONT_TILES_START,Font_TILE_COUNT,Font_tiles);

    set_sprite_data(0,paddle_TILE_COUNT,paddle_tiles);
    set_sprite_data(paddle_TILE_COUNT,ball_TILE_COUNT,ball_tiles);

    ...
}
In the above code snippet we also enabled sound, and turned on our sprites/background/display.
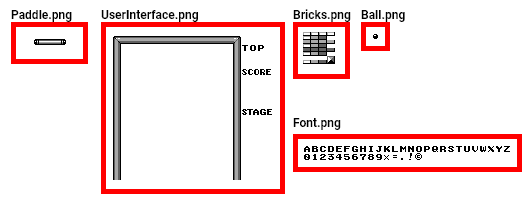
For setting tiles in VRAM we used the “set_bkg_data” & “set_sprite_data” GBDK functions. Into those functions we passed values generated from the GBDK 2020 utility: png2asset. Png2Asset comes with the gbdk 2020, and is used to convert modern PNG graphics to files compatible with GBDK 2020. Here is a sum of all the graphics used:
The conversion from PNG to GBDK format occurs in our “generate-graphics.bat”. Here is how that’s done:
:: Sprites
%PNG2ASSET% graphics\paddle.png -c source\gen\graphics\paddle.c  -sw 32 -sh 8 -spr8x8 -keep_palette_order -noflip
%PNG2ASSET% graphics\ball.png -c source\gen\graphics\ball.c -sw 8 -sh 8 -spr8x8 -keep_palette_order -noflip

:: Backgrounds Tiles
%PNG2ASSET% graphics\UserInterface.png -c source\gen\graphics\UserInterface.c -map -use_map_attributes  -keep_palette_order -noflip
%PNG2ASSET% graphics\Bricks.png -c source\gen\graphics\Bricks.c -map -use_map_attributes  -keep_palette_order -noflip
%PNG2ASSET% graphics\Font.png -c source\gen\graphics\Font.c -map -use_map_attributes  -keep_palette_order -noflip
Usage of PNG2Asset isn’t required, it’s just my personal preference. A reliable alternative would be GBTD and GBMB. Those two tools allow you to create tiles and tile-maps respectively.
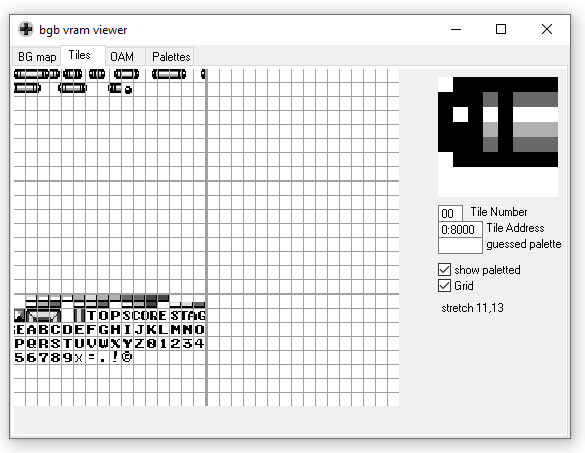
When our VRAM is fully populated with our tile data we can check it out using any Gameboy emulator’s VRAM Viewer.
The conversion from PNG to GBDK format occurs in our “generate-graphics.bat”. Here is how that’s done:
:: Sprites
%PNG2ASSET% graphics\paddle.png -c source\gen\graphics\paddle.c  -sw 32 -sh 8 -spr8x8 -keep_palette_order -noflip
%PNG2ASSET% graphics\ball.png -c source\gen\graphics\ball.c -sw 8 -sh 8 -spr8x8 -keep_palette_order -noflip

:: Backgrounds Tiles
%PNG2ASSET% graphics\UserInterface.png -c source\gen\graphics\UserInterface.c -map -use_map_attributes  -keep_palette_order -noflip
%PNG2ASSET% graphics\Bricks.png -c source\gen\graphics\Bricks.c -map -use_map_attributes  -keep_palette_order -noflip
%PNG2ASSET% graphics\Font.png -c source\gen\graphics\Font.c -map -use_map_attributes  -keep_palette_order -noflip
Usage of PNG2Asset isn’t required, it’s just my personal preference. A reliable alternative would be GBTD and GBMB. Those two tools allow you to create tiles and tile-maps respectively.
When our VRAM is fully populated with our tile data we can check it out using any Gameboy emulator’s VRAM Viewer.

uint8_t UpdatePaddle(){

    if(joypadCurrent & J_LEFT){
        paddleXSpeed=-600;

    }else if(joypadCurrent & J_RIGHT){
        paddleXSpeed=600;

    }else{

        // Slow down
        if(paddleXSpeed>30)paddleXSpeed-=30;
        else if(paddleXSpeed<-30)paddleXSpeed+=30;
        else paddleXSpeed=0;
    }

    paddleX=CLAMP(paddleX+(paddleXSpeed>>4),LEFT_PADDLE_LIMIT,RIGHT_PADDLE_LIMIT);


    /// Check if we are at the right limit
    if(paddleX>=RIGHT_PADDLE_LIMIT){
        paddleX=RIGHT_PADDLE_LIMIT;
        paddleXSpeed=-ABS((paddleXSpeed)/4)*2;
    }
    // Check if we are at the left limit
    else if(paddleX<=LEFT_PADDLE_LIMIT){
        paddleX=LEFT_PADDLE_LIMIT;
        paddleXSpeed=ABS((paddleXSpeed)/4)*2;
    }
    return move_metasprite(paddle_metasprites[0],0,0,(paddleX>>4)+8,(paddleY>>4)+16);
}
For resetting the paddle, we just set it’s horizontal speed to zero and place it in the middle of the screen (horizontally).
void ResetPaddle(){


    paddleX=80<<4;
    paddleY=130<<4;
    paddleXSpeed=0;

}
Bricks
For the bricks, a large (constant) array of unsigned integers is used. I created macros to help in building the array:
- NO____BRICK – For no bricks
- LGHT__BRICK – For Light Bricks
- MED___BRICK – For Medium Bricks
- DRK___BRICK – For Dark Bricks

There should be enough bricks to fill around 17 rows.
const uint8_t level[AREA_TOTAL]={
    NO____BRICK,NO____BRICK,NO____BRICK,NO____BRICK,NO____BRICK,NO____BRICK,NO____BRICK,NO____BRICK,NO____BRICK,NO____BRICK,NO____BRICK,NO____BRICK,NO____BRICK,NO____BRICK,
    NO____BRICK,NO____BRICK,NO____BRICK,NO____BRICK,NO____BRICK,NO____BRICK,NO____BRICK,NO____BRICK,NO____BRICK,NO____BRICK,NO____BRICK,NO____BRICK,NO____BRICK,NO____BRICK,
    NO____BRICK,NO____BRICK,LGHT__BRICK,LGHT__BRICK,LGHT__BRICK,LGHT__BRICK,LGHT__BRICK,LGHT__BRICK,LGHT__BRICK,LGHT__BRICK,LGHT__BRICK,LGHT__BRICK,NO____BRICK,NO____BRICK,
    NO____BRICK,NO____BRICK,MED___BRICK,MED___BRICK,MED___BRICK,MED___BRICK,MED___BRICK,MED___BRICK,MED___BRICK,MED___BRICK,MED___BRICK,MED___BRICK,NO____BRICK,NO____BRICK,
    NO____BRICK,NO____BRICK,MED___BRICK,MED___BRICK,MED___BRICK,MED___BRICK,MED___BRICK,MED___BRICK,MED___BRICK,MED___BRICK,MED___BRICK,MED___BRICK,NO____BRICK,NO____BRICK,
    NO____BRICK,NO____BRICK,LGHT__BRICK,LGHT__BRICK,LGHT__BRICK,LGHT__BRICK,LGHT__BRICK,LGHT__BRICK,LGHT__BRICK,LGHT__BRICK,LGHT__BRICK,LGHT__BRICK,NO____BRICK,NO____BRICK,
    NO____BRICK,NO____BRICK,DRK___BRICK,DRK___BRICK,DRK___BRICK,DRK___BRICK,DRK___BRICK,DRK___BRICK,DRK___BRICK,DRK___BRICK,DRK___BRICK,DRK___BRICK,NO____BRICK,NO____BRICK,
    NO____BRICK,NO____BRICK,NO____BRICK,NO____BRICK,NO____BRICK,NO____BRICK,NO____BRICK,NO____BRICK,NO____BRICK,NO____BRICK,NO____BRICK,NO____BRICK,NO____BRICK,NO____BRICK,
    NO____BRICK,NO____BRICK,NO____BRICK,NO____BRICK,NO____BRICK,NO____BRICK,NO____BRICK,NO____BRICK,NO____BRICK,NO____BRICK,NO____BRICK,NO____BRICK,NO____BRICK,NO____BRICK,
    NO____BRICK,NO____BRICK,NO____BRICK,NO____BRICK,NO____BRICK,NO____BRICK,NO____BRICK,NO____BRICK,NO____BRICK,NO____BRICK,NO____BRICK,NO____BRICK,NO____BRICK,NO____BRICK,
    NO____BRICK,NO____BRICK,NO____BRICK,NO____BRICK,NO____BRICK,NO____BRICK,NO____BRICK,NO____BRICK,NO____BRICK,NO____BRICK,NO____BRICK,NO____BRICK,NO____BRICK,NO____BRICK,
    NO____BRICK,NO____BRICK,NO____BRICK,NO____BRICK,NO____BRICK,NO____BRICK,NO____BRICK,NO____BRICK,NO____BRICK,NO____BRICK,NO____BRICK,NO____BRICK,NO____BRICK,NO____BRICK,
    NO____BRICK,NO____BRICK,NO____BRICK,NO____BRICK,NO____BRICK,NO____BRICK,NO____BRICK,NO____BRICK,NO____BRICK,NO____BRICK,NO____BRICK,NO____BRICK,NO____BRICK,NO____BRICK,
    NO____BRICK,NO____BRICK,NO____BRICK,NO____BRICK,NO____BRICK,NO____BRICK,NO____BRICK,NO____BRICK,NO____BRICK,NO____BRICK,NO____BRICK,NO____BRICK,NO____BRICK,NO____BRICK,
    NO____BRICK,NO____BRICK,NO____BRICK,NO____BRICK,NO____BRICK,NO____BRICK,NO____BRICK,NO____BRICK,NO____BRICK,NO____BRICK,NO____BRICK,NO____BRICK,NO____BRICK,NO____BRICK,
    NO____BRICK,NO____BRICK,NO____BRICK,NO____BRICK,NO____BRICK,NO____BRICK,NO____BRICK,NO____BRICK,NO____BRICK,NO____BRICK,NO____BRICK,NO____BRICK,NO____BRICK,NO____BRICK,
    NO____BRICK,NO____BRICK,NO____BRICK,NO____BRICK,NO____BRICK,NO____BRICK,NO____BRICK,NO____BRICK,NO____BRICK,NO____BRICK,NO____BRICK,NO____BRICK,NO____BRICK,NO____BRICK
};
For drawing the bricks, i can pass the above array into the following function called “DrawLevelBricks“. I made this a function so other levels could easily be created and run.
This function just loops through the Area height (17) and Area width (14), setting the proper background tile for each. The tile used is already set in the previously created macros used for the level array.
This function also counts how many bricks are left. Later, when the blocksLeft variable reaches 0, the game will reset and you could tell it to load another level.
void DrawLevelBricks(uint8_t *level){

    // Reset this counter to zero
    // We'll recount in the following double for-loops
    blocksLeft=0;

    for(uint8_t i=0;i<AREA_HEIGHT;i++){
        for(uint8_t j=0;j<AREA_WIDTH;j++){

            uint8_t brick = level[i*AREA_WIDTH+j];

            if(brick==NO____BRICK){
                set_bkg_tile_xy(j+1,i+1,0);

            }
            else {
                set_bkg_tile_xy(j+1,i+1,brick);

                // Increase how many blocks are left
                blocksLeft+= (brick==LGHT__BRICK||brick==MED___BRICK||brick==DRK___BRICK)? 2:1;
            }
        }
    }

}
Checking for Top/Bottom Bricks.
Next we have to setup a function called “CheckTopOrBottomBrick“. This function is for determining if a given x/y coordinate is a brick or not. In addition this function will return which brick, top or bottom, is at the given x/y coordinate. This will be used when the ball is checking for collision against the bricks.
The difficulty is that the bricks are 4×8 instead of 8×8. Which means, a single tile can have 0, 1, or 2 bricks in it. So, this gives us the following possibilities for a single tile:
| Top | Bottom |
| Light | Light |
| Light | Medium |
| Light | Dark |
| Light | None |
| Medium | Light |
| Medium | Medium |
| Medium | Dark |
| Medium | None |
| Dark | Light |
| Dark | Medium |
| Dark | Dark |
| Dark | None |
| None | Light |
| None | Medium |
| None | Dark |
| None | None |
The “CheckTopOrBottomBrick” function will return one of the following values based off of those possibilities:
- 0 – There is nothing solid at the given coordinate
- WALL – There is something solid at the given coordinate, but it’s not a brick
- TOP – The given coordinate intersects with a brick in the top half.
- BOTTOM – The given coordinate intersects with a brick in the bottom half.
uint8_t CheckTopOrBottomBrick(int16_t x, int16_t y){
if(x<=8) return WALL;
if(y<=8) return WALL;
if(x>=120) return WALL;
// Get the background tile at the given location
uint8_t brick =get_bkg_tile_xy(x/8,y/8);
// If this tile is zero, both the top and bottom tile have been destroyed
if(brick==0) return 0;
// Get the vertical middle of the tile
uint8_t mid = (y/8)*8+4;
uint8_t bottomMissing = brick==4||brick==8||brick==0x0C;
uint8_t topMissing = (brick-1)>=12&&(brick-1)<15;
// Return if it's the top or bottom
if((y/4)%2!=0 && !bottomMissing)return BOTTOM;
if((y/4)%2==0 && !topMissing)return TOP;
if(brick>=0x10)return WALL;
//
return 0;
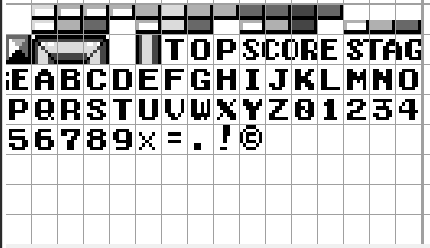
}Here’s a screenshot of the game’s VRAM for background tiles.
Updating Bricks
When a brick is hit, we need to update the background tile associated with it. A single background tile can have 0, 1, or 2 bricks drawn with it. So, in addition to the x & y coordinate, we pass in which side was hit from the “CheckTopOrBottomBrick” function.
If we pass TOP in, then the associated tile’s top brick will be cleared. Conversely, if we pass BOTTOM in, then then the associated tile’s top brick will be cleared. If these bricks are already empty, then nothing happens.
void UpdateBrick(uint8_t side, uint8_t x, uint8_t  y){

    uint8_t column=x/8;
    uint8_t row=y/8;

    // Get the background tile at the given location
    uint8_t brick =get_bkg_tile_xy(column,row);

    // If this tile is zero, both the top and bottom tile have been destroyed
    if(brick==0) return;
    if(brick>=USERINTERFACE_TILES_START)return;

    uint8_t brickRow= 0;

    side = (y/4)%2==0?TOP:BOTTOM;

    // Clearing the brick
    // If we're top only or bottom only
    if((brick==4||brick==8||brick==12)&&side==TOP)set_bkg_tile_xy(column,row,0);
    else if(brick>=13&&side==BOTTOM)set_bkg_tile_xy(column,row,0);
    else{

        uint8_t nextTile=brick;
        if(side==BOTTOM){
            if(brick>=1&&brick<=3)nextTile=4;
            else if(brick>=5&&brick<=7)nextTile=8;
            else if(brick>=9&&brick<=11)nextTile=12;
        }
        else if(side==TOP){
            if(brick>=1&&brick<=3)nextTile=13;
            else if(brick>=5&&brick<=7)nextTile=14;
            else if(brick>=9&&brick<=11)nextTile=15;
        }

        set_bkg_tile_xy(column,row,nextTile);
    }


}
Collision Detection
Now that we have our ball, the paddle, and our bricks drawn we can move onto handling collision amongst them. We split this into two functions:
- CollideBricksAgainstBall
- CollidePaddleAgainstBall
These functions are defined in collision.c, and called at the end of our game loop (when the ball is active).
Ball Collision against Bricks
For collision against the bricks, the ball will check for bricks at 2 different points.
- The horizontal edge in the direction the ball is moving
- The vertical edge in the direction the ball is moving
This means, if the ball is moving to the right it will check its right edge. If the ball is moving upward, it will check it’s top edge. The opposites are also true. If the ball is moving to the left, it will check it’s left edge. If the ball is moving downward, it will check it’s bottom edge.
This type of collision detection is really basic. An improvement would involve using actual circle/rectangle collision detection and response. This will not be done in this tutorial. Here is a link if that’s the direction you want to go in later.
We check for bricks using the previously created “CheckTopOrBottomBrick” function. If this function returns a non-zero value (WALL, TOP, or BOTTOM). It will change the ball’s velocity. If the function returns TOP or BOTTOM, it will additionally update the tile, increase our score, and decrease our blocksLeft variable.
void CollideBricksAgainstBall(){

    int16_t verticalSide=SIGN(ballVelocityY);
    int16_t horizontalSide=SIGN(ballVelocityX);

    int16_t checkHorizontal = (ballX>>4)+horizontalSide*BALL_RADIUS;
    int16_t checkVertical = (ballY>>4)+verticalSide*BALL_RADIUS;

    uint8_t topBottomOrWall = CheckTopOrBottomBrick(ballX>>4,checkVertical);

    // If the ball hit something
    if(topBottomOrWall!=0){

        ballVelocityY=-verticalSide*ABS(ballVelocityY);

        // Increase Speed slightly with each bounce
        ballVelocityY+=SIGN(ballVelocityY)*BALL_SPEEDUP;

        // If we didn't hit a wall
        if(topBottomOrWall!=WALL){

            blocksLeft--;

            // Play a sound
            NR10_REG=0X00;
            NR11_REG=0X81;
            NR12_REG=0X43;
            NR13_REG=0X73;
            NR14_REG=0X86;

            IncreaseScore(5);

            UpdateBrick(topBottomOrWall,ballX>>4,checkVertical);
        }else{

            // Play a sound
            NR10_REG=0X4A;
            NR11_REG=0X81;
            NR12_REG=0X43;
            NR13_REG=0X56;
            NR14_REG=0X86;
        }
    }


    topBottomOrWall = CheckTopOrBottomBrick(checkHorizontal,ballY>>4);


    // If the ball hit something
    if(topBottomOrWall!=0){

        // Reflect
        ballVelocityX=-horizontalSide*ABS(ballVelocityX);

        // Increase Speed slightly with each bounce
        ballVelocityX+=SIGN(ballVelocityX)*BALL_SPEEDUP;

        // If we didn't hit a wall
        if(topBottomOrWall!=WALL){

            // Decrease how many bullets we have
            blocksLeft--;


            // Play a sound
            NR10_REG=0X00;
            NR11_REG=0X81;
            NR12_REG=0X43;
            NR13_REG=0X73;
            NR14_REG=0X86;


            IncreaseScore(5);

            // Update the brick at the location
            UpdateBrick(topBottomOrWall,checkHorizontal,ballY>>4);
        }else{


            // Play a sound
            NR10_REG=0X4A;
            NR11_REG=0X81;
            NR12_REG=0X43;
            NR13_REG=0X56;
            NR14_REG=0X86;
        }
    }
}
Ball Collision against The Paddle
The final aspect of collision is against the paddle.
For simplicity sake, we’ll consider the ball and the paddle to both be axis-aligned (non-rotated) rectangles. This makes intersection a simple task. For both the x-axis and the y-axis, we get the distance between their centers. If both distances are smaller than the sum of their half-width/half-heights, then we have collision.
In the case of collision, we’ll play a sound and reflect the ball’s y velocity. If the ball is near the edge of the paddle, we’ll also reflect the ball’s x velocity.
NOTE: Our variables for the ball and paddle’s positions are scaled integers. So, when comparing against non-scaled integers, we need to shift them to the right to utilize their true values.
void CollidePaddleAgainstBall(){
    int16_t xd = (int16_t)(ballX>>4)-(int16_t)(paddleX>>4);

    xd = ABS(xd);

    if(xd<=PADDLE_SIZE/2+BALL_RADIUS){

        int16_t yd =(int16_t)(ballY>>4)-(int16_t)(paddleY>>4);

        yd = ABS(yd);

        if(yd<=(PADDLE_HALF_THICKNESS+BALL_RADIUS)){

            // Flip the y velocity
            ballVelocityY=-ballVelocityY;

            NR10_REG=0X2B;
            NR11_REG=0X81;
            NR12_REG=0X41;
            NR13_REG=0X5C;
            NR14_REG=0X86;

            if(xd>PADDLE_SIZE/2-PADDLE_HALF_THICKNESS){
                if(paddleX<ballX){
                    // Use the negative absolute value so it goes right
                    ballVelocityX=ABS(ballVelocityX);
                    ballX=MAX(ballX,paddleX+1+PADDLE_SIZE/2+((PADDLE_HALF_THICKNESS-BALL_RADIUS)<<4));
                }else{
                    // Use the negative absolute value so it goes left
                    ballVelocityX=-ABS(ballVelocityX);
                    ballX=MIN(ballX,paddleX-1-PADDLE_SIZE/2-((PADDLE_HALF_THICKNESS-BALL_RADIUS)<<4));
                }
            }
            ballY=MIN(ballY,paddleY-((1+PADDLE_HALF_THICKNESS+BALL_RADIUS)<<4));

        }


    }
}
Resetting our Games State
When all blocks are cleared, and before the game loop begins; we’ll call a function called “ResetToReady”. This function simply resets everything, including the score, and changes the ball’s state to ready.
void ResetToReady(){
    ballState = BALLSTATE_READY;
    score=0;

    ResetUserInterface();

    DrawLevelBricks(level);
    ResetPaddle();
    ResetBall();
}
Conclusion
That’s it! You should a basic Brick Breaker game like Alleyway. If you want to see the code for this tutorial, it can be found on GitHub.