This tutorial assumes you have previously installed the Butano Game engine. If not, see my previous tutorial: Setting up Butano for Making GBA Games.
Creating a new project with The Butano Template
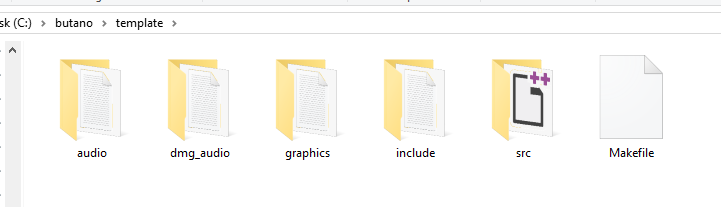
The Butano project comes with a “template” folder. For each project, you should make a copy of this folder. Avoid directly editing this folder, as that may interfere with future projects.
Compiling your ROM file
You can compile and run your project using make. For windows users, if you don’t already have make installed, you may need to install something such as “Make for windows“.
Before you can compile your ROM file, you’ll need to open up the “Makefile” and adjust two of the variables:
- TARGET – This is the name of the output ROM. By default, it will have a value of “$(notdir $(CURDIR))”, which means the name of the project folder. This is optional.
- LIBBUTANO – This is where the makefile can find all of the library source code, includes, and tools.. NOT the folder, you originally extracted. This is the “butano” folder INSIDE of that folder. You should see Four folders (hw, include, src, and tools) and a “butano.mak” file in this folder.
There are many other variables you can configure, but you should be fine with only adjusting those two. If you’re LIBBUTANO variable is set incorrectly, you’ll get errors like this:
D:\path\to\my\butano\project>make
Makefile:60: /butano.mak: No such file or directory
make: *** No rule to make target '/butano.mak'.  Stop.
The first time you compile your project, it will always take a long time. Worry not, future compilations will be faster. After the first compilation, only future additions will need to be compiled.
Note: To improve build time, you should call “make -j8” if your pc has 8 cores, for example
Source Code
All source code should go in the “src” folder. Header files should go in the “include” folder. The makefile in the Butano template is already configured to look in those 2 locations. This can be changed if you truly want.
The provided template will have a single “main.cpp” file, this file will be very minimal:
#include "bn_core.h"

int main()
{
    bn::core::init();

    while(true)
    {
        bn::core::update();
    }
}
Important Note: You should NOT do anything with Butano BEFORE callIing “bn::core::init”
Graphics
For backgrounds and sprites, you must use bitmap images without any compression, or color space information. These bitmaps must go the “graphics” folder, and they must be accompanied by a matching .json file. The json file should have the same name has the bitmap file.
Important Note: All graphics (sprites and backgrounds) must have all lowercase names. Also if you see an error, like “basicbackground.bmp error: Invalid bits per pixel: 24” make sure you are exporting with an indexed palette.
Your json file should define a single object, that has a “type” property.
{
    "type": "sprite"
}
There are 8 possible values for that type property:
- sprite
- sprite_tiles
- sprite_palette
- regular_bg
- regular_bg_tiles
- affine_bg
- affine_bg_tiles
- bg_palette
Each type has it’s own properties. I’ll cover those in later
Audio & DMG Audio
Audio files will go in your “audio” or “dmg_audio” folder. These should be one of the following formats:
- Music
- *.mod
- *.xm
- *.s3m
- *.vgm
- *.it
- Sound Effects
- *.wav
Matching *.json files are not required for audio files. Although, for DMG music modules you can optionally include a matching .json file to specify import options.
Read Here for more information about Audio in Butano: Audio – Importing Assets | Butano Docs